Look at those castings gleam!
These are some Gingery Lathe parts that were just shaken out of the
molds. They are still in the rough, as you can see, and the sprues and
risers need to be cut off. The shiny surface is the result of carefully
selecting the right pouring temperature.
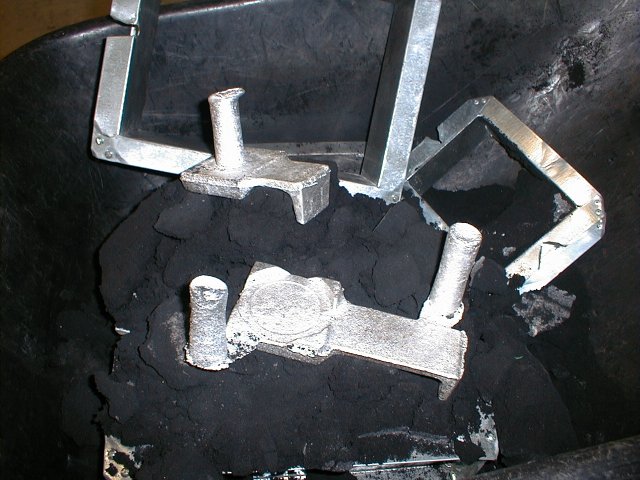
These castings were poured with the metal definitely too hot. They did
clean up quite nicely, however. The mold is formed from wooden patterns
that exactly match what is to be cast. The patterns for these castings
were made from 1/4″ thick lauan plywood. The shapes were drawn with DeltaCAD
v3.0, printed out at 1:1 and then traced onto the wood. The shapes were
then cut out and nailed together where necessary. Filleting was formed
with clear packaging tape applied to the inside corners to provide a
rounding effect.
Now I much prefer making patterns with bondo and then painting them
with high gloss spray paint.
 Dremel router attachment castings in the rough
Here is the finished project. Notice the patterns sitting to the right.
I used clear packaging tape to cover the patterns instead of
shellacking them. The packaging tape also forms the fillets on the
bracket and the base. The ribs on the base pattern are formed from wire
and the knob bosses are formed with washers. I purchased the black
knobs at ACE hardware and also the screws that hold them on. Some time
in the future, I may improve the patterns with auto body putty and a
coat of paint, but I’ll have to see what the probability of making more
of these really is…There are holes drilled from the bottom of the router base up into the
bracket casting. Boy was that a trick. And then the holes needed to be
tapped to accept 8-32 screws. The straps that hold the Dremel tool onto
the bracket are just 18 guage galvanized sheet metal.
The attachment has several advantages over conventional routers. The
low mounting profile of the knobs allow precise control. Also, there
are more varieties of bits available for the Dremel tool, and thus
expand the capabilities of it.
 Dremel router attachment
You know the story…a deer jumps out in front of you, and before you
have time to say ‘sand-casting,’ your vehicle has been inflicted with
some serious cosmetic damage. Well, I don’t know how much cosmetic
damage an old station wagon can really sustain, as these old beasts
aren’t too much into cosmetics as most vehicles (and their owners) are
concerned.At any rate, I wasn’t going to spend a couple
hundred dollars on cosmetics for an 85 model with well over 100k miles
on it. The molten metal ideas began to flow…
 Cast aluminum grill for my ’85 Buick Lesabre
The grill is actually 2 castings, one a mirror image of the other. Each
required a full one and a half quart crucible full of metal. The
pattern was made of styrofoam, and cut with hot wire foam cutting process.For
the molds, I used sharp silica sand, with a 2-part air-setting resin
binder. (Sorry folks, I don’t know the name of the stuff, it was
delivered to me in 2 coffee cans by a friend from a foundry making
parts for GM!) The foam patterns were removed (chipped and broke out)
before pouring. The molds were very heavy, each half weighing 30 or 40
pounds.
My friends used to kid me that I should have cast some
long, barbed spikes on the grill, so that the next time I hit a deer,
it would stay lodged, and then I would have “venison on the grille!”
 Top view of cast aluminum auto grill
Breakdowns are especially bad when it’s borrowed equipment. My dad
loaned me his log splitter a while back, and I was merrily splitting
away when *pop* a bracket on the hydraulic spool valve snapped. It was
the bracket that steadies the control lever linkage. So I epoxied the
broken part (right), ‘reinforced’ it with some bondo, and used it for a
pattern to cast the replacement.
 Hydraulic lever bracket in the rough
Now with all the holes drilled, flash and other imperfections filed
off, and ready to be bolted in place. This casting was a bit tricky
because of its irregular shape and lack of good parting line. The
trickiest part was the setting the core that formed the hole in the
center.
 Hydraulic lever bracket, finished
So there you have it. I don’t know how much this part would have cost,
or even if it is available, but now it doesn’t matter. The home shop
foundry has won again! (Note melting furnace, sitting proudly in the
background.)
 Hydraulic lever bracket, installed
One of my readers had a little project for me to do…here’s the
chronicle of this ongoing project. Whatever in the world does aluminum
have to do with corn? Here’s a case of a pattern being made of a mold,
then a mold being made from the pattern!
 Plastic corn halves coated with release