A foam cutting lathe?!
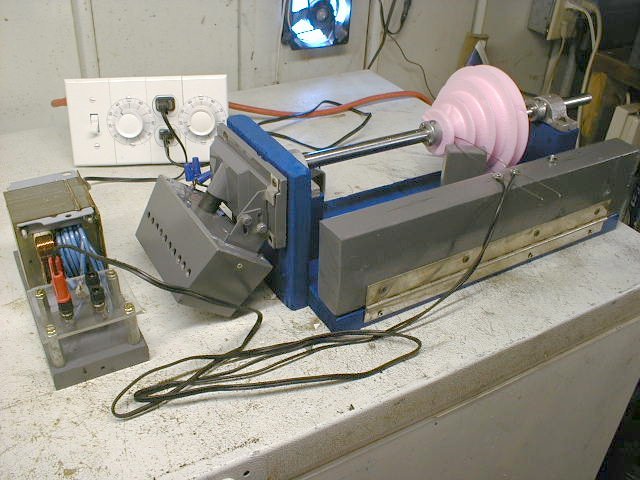
This article is about my adventures in foam cutting with a hot wire method. Here is a homebuilt foam turning lathe!! This is made from a window
motor adapted and appropriately painted for the application. The pillow
blocks that the rotating shaft bear in were made from foam patterns and
cast using the above mentioned techniques.
The two dials on the
electrical box are light dimmers with simple numerical 10 through 100
markings for remembering settings. One is for the wire heat, the other
controls motor speed. The object that is being turned on the lathe is a
step pulley pattern. The picture below shows a similar pattern and a
resulting pulley casting!
Here I am cutting out a pillow block pattern for a lost foam casting.
The paper stencil was designed using DeltaCad 3.2 and simply cut out
with scissors. The curved rod is a 1/4-20 threaded rod with brass nuts
to position the top wire terminal for varying cutting angles. It is a
bit tricky to set it perfectly square with the cutting table. The
transformer on the right is controlled by one of the light dimmers,
center. The transformer is a modified microwave oven transformer with
several taps for different lengths and sizes of cutting wire. The wire
is not easily visible in the photo, it is a fairly fine wire, a violin
“e” string.NEVER, EVER, EVER apply power to a microwave oven transformer with its original high voltage secondary winding. If you don’t know what I mean, then never apply power to a microwave oven transformer at all.
 Foam cutting table and bow
A better view of the foam cutting table setup. Note the knob for loosening the wire.
 Better view of foam cutting
table
Here the pattern is done except for the hole in the center for the
shaft. To cut the hole, I loosen the knob at lower right to release the
cutting wire. Then a reamer or punch is used to make a hole in the foam
pattern, the cutting wire is fed through this hole, and re-tightened.
The power is turned back on and the hole cut out. Then the wire is
again released and the plug is removed from the hole. The pattern is
ready to cast. Instead of making a core to form a hole in the casting,
I simply put a 5/8″ shaft through the hole and cast the metal right on
it. After cooling, the shaft is driven out. This forms a nice smooth
hole without ever machining it.
 Pillow block template was
made using DeltaCAD
Notice the rough round foam blanks in the center background. These get
glued together to form a blank large enough to turn a foam step pulley
pattern from. Also, note the mold lines on the aluminum step pulley
casting. This casting was not done with lost foam techniques, but by
traditional molding techniques using a split foam pattern! Foam as you
can see is a very versatile pattern material. It is, of course more
fragile than wood and is harder to get a good surface finish like with
wood patterns.TECHIE STUFF !! (what you really came for…)
Now, here is the more technical notes concerning hot wire foam cutting
techniques. These notes were inspired in part by email communications
that I had with David Wimberley, the author of the David Wimberley
Forge plans, available through Lindsay publications.
(www.lindsaybks.com) David happened across this site sometime around
August of 1999, and told me of his plans to begin experimenting with
foam cutting. At that time, we had an inactive (coming soon) link that
was bringing a few “foam cutting” hits, and after conversing at some
length with him concerning this art, or sport, or whatever, decided it
was time to address the matter.
Wire for hot wire cutting
First the wire. Any wire will do that can remain taut under heat. If
the wire is low grade steel, for example galvanized picture wire, it
won’t last long because it gets soft with the heat — even the low temp
of foam cutting — and snaps. David’s choice of guitar wire is probably
good. I have used stainless MIG welding wire, and I’ve used violin “e”
string wire. I don’t know what guitar wire is made of, but I do know
that it is a very springy type of wire, and made to handle tension. I
have used mandolin wire also (practically the same thing as guitar) and
it worked quite well. The size of the wire is also noteworthy. The
smaller wire diameter, the finer the cut you can make.
 Step pulley pattern cut from foam
Power supplyGetting the power from your 110 volt receptacle
to a suitable foam cutting format presents several problems. A standard
light dimmer can be successfully used to vary the heat, but it can’t
heat the wire in a direct circuit. With a light dimmer powered by
straight line current, you are taking a great risk of electric shock.
Also, a guitar string is not going to be longer than about 2-3 feet
(unless you get it bulk). But then how long of a wire are you planning
to cut with? If the wire is too short (like only a foot or two) the
light dimmer won’t be able to go low enough and may self destruct from
excessive current, or it may light the wire up orange hot and snap it.
![]() Schematic for dimmer +
Schematic for dimmer +
doorbell transformer
foam cutter
You can use bell transformers for foam cutting, but people tell me that
they don’t hold up for cutting with very heavy wire, so I don’t
recommend them at all any more. If you must, they are
available at your local Kmart, Walmart, or Home Depot for about 15
dollars, and are intended for doorbells. They put out 24 volts nominal,
and they can be operated with most light dimmers to vary the current. I
haven’t found a light dimmer yet that doesn’t vary a transformer. This
despite the warnings that you shouldn’t use a dimmer with a
transformer. (But don’t try to vary the speed of your ac-adapter
powered tape recorder with this arrangement.) The bell transformer also
isolates the resistance wire voltage from line current so that if you
do come in contact with the wire or it’s terminals that you aren’t a
short circuit to ground. Also, there’s less voltage there to hurt you
should you happen to touch both ends of the wire at once. I don’t mean
to be simplistic about safety, just extra cautious, as I am not a
professional, but a hobbyist.A highly recommended alternative to bell
transformers: Low voltage lighting transformers. I’ve also used
modified microwave transformers like the one pictured to the right, or I’ve
used transformers that come out of old power supplies
for radios, office equipment, etc. These can have varying voltages,
allowing for longer wires for cutting, etc. If you do end up needing a
higher voltage for longer cuts, just gang up two or more bell
transformers in series. Or, need more current? Gang them up in
parallel. Just make sure you get the polarity right. No, transformers
don’t have a plus or minus, but when you have two windings (four wires)
they do have polarity with respect to each other.
Wire Temperature
The cutting wire does not get red hot to cut foam. It does get hot
enough to smoke, however. The power supply ideally should be capable of
heating up the wire well above the cutting temperature, and the reason
is covered here. Getting the wire red hot isn’t all bad. I find that
being able to heat the wire up well beyond cutting temperature is
helpful in cleaning the wire. When the wire gets gummed up with
residue, it can easily be cleaned by heating up the wire till it starts
to smoke, then wipe a cloth over it and it comes nice and clean. The
trouble with residue is that it leaves little blobs on the finished
cut. However, getting the wire red hot takes the temper out of it, and
too much red heat on your cutting wire will fatigue it and cause it to
fail, possibly at an important stage of a complicated cut.
Cutting Speed
The speed that your cutting wire moves through the workpiece is
noteworthy. If you try to cut too fast, the wire will make a distorted
cut because it is pulled into an arc in the midsection of the
workpiece. If you cut too slow, the wire will cause the foam to shrink
back from the heat, and also droplets of melted foam will adhere to the
wire and leave hard little knots in the surface of the cut. It is
important to understand what the wire is doing as it cuts foam.
Some important events take place when the wire initially heats up, when
you start into the workpiece, and when you come to a corner or a detail
in your stencil. One thing I have discovered is that after you turn on
your power supply and dial it to the desired heat setting, the wire has
already gotten too hot. But that very same setting is too cold once
you’ve cut an inch or two and cutting goes SLOW. This is a problem that
I have been thinking about for sometime, and am on the verge of an
invention with.
The Bow
Taut-hot-wire foam cutting
requires some kind of bow, or hoop, or frame, to keep the wire tight
and straight. These can be any thing your imagination can cook up. It
should meet a few simple requirements, however, to make the technique
as trouble free and practical as possible.
The bow needs to allow wiring or other system of electrical conduction to the wire, to heat it, of course.
The bow needs to exert some tension on the wire to keep it straight.
The bow needs to have sufficient throat to accommodate desired depth of cuts.
The bow needs to be able to be handled, or to be fixed to a stationary
surface in such a way to allow the workpiece to be moved across it.
If you do much foam cutting, you will find that soon you have an array
of bows, each for a slightly different type of cut. The bow that I
prefer to use for small lost foam patterns has a table that keeps the
workpiece square with the cutting wire. This allows nice square cuts,
perpendicular to the flat surface of the foam sheet. The next section
will cover shaped wire cuts, which have their own special type of wire
holder, different from the bow in that it does not exert tension to the
wire, but rather holds it in a fixed position, maintaining the intended
shape of the wire.
Shaped Wire Cutting
This technique
was employed in the making of the step pulley patterns. Here, stiff,
heavy wire was bent into a shape that was to be applied to the
workpiece: V-grooves. The factors that need to be considered here are
the actual shape desired from the wire shape (they’re not equal), and
the cutting resistance of the foam. There may be other factors, as
well. Almost any hot wire cut will show signs of the foam shrinking
back from the hot wire. This may mean that in order to cut a 1/4″
groove, you may need to bend up a wire shape that reflects more of a
3/16″ groove. Bending wire shapes to cut a predetermined shape in foam
is an art, and I have not mastered it, but have certainly had a lot of
fun experimenting with it. That’s all for now, folks!
 My latest power supply for
foam cutting, also use it for SMT desoldering