Let’s hack a USB hard drive!
Haven’t you always wondered what’s inside an external hard drive,
especially those portable USB-powered ones? You’re about to find out.
Lately my favorite local tech retailer has been running specials on
these miniature, USB-powered portable external hard drives that you can
carry in a shirt pocket. I had a real good idea that it was going to
simply be a 2.5-inch notebook hard drive, either an IDE or SATA type. I
was right.Energy saving was a primary motivation to do this. Recently one of my
computer’s hard drives failed, and so my thought process for replacing
it was to incorporate a power saving strategy at the same time. A
notebook drive, being optimized for battery life, draws a mere 2 watts.
A 3.5-inch destop drive can draw upwards of 12 watts. The difference
will save me around $7.88 a year based on 24x7x365 uptime. I know
that’s not real significant, but other advantages are decreased load on
power supply, lower noise level, et cetera.
 Brand New WD Passport USB Drive
So I went to Best Buy, and got a 120GB Western Digital Passport USB
drive for $89. There’s just nothing like buying something brand new,
and then tearing it apart. I assured the salesmen that I fully
understood the warranty implications.
The exact model number of the unit (as a fully assembled external USB hard drive) is WD1200U017-005.
Here’s the underside of the drive. I have obscured the serial number in
all these photos for obvious reasons. The enclosure was totally black
plastic, with rubber feet.
 Ready to open the case
I just started at one corner with the xacto knife, pried it open until
I could get the blade of my screwdriver in, and worked my way around.
It wasn’t even glued. There was a locking channel in the case that was
intended to be snapped together to stay. It was a good design.
 Hard drive case open, all warranties null and void
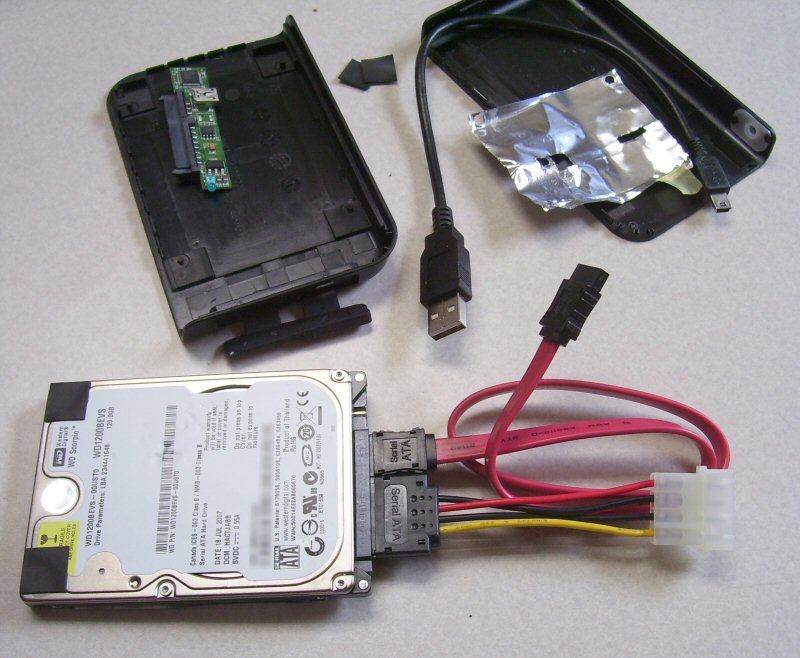
And, lo and behold, the drive turned out to be a stock Western Digital
Scorpio WD1200BEVS serial ATA notebook hard drive. There were little
rubber shock mounts protecting it inside the plastic case.The part that the usb cable connected to, as you can see, is a very
narrow circuit board with very few chips on it. Now I have an extra
usb-to-serial-ata converter!
The jumper that was installed on the drive (you can see it on the right
side) is set to enable the RPS (reduced power spinup) mode. This was
important in external USB drive applications as the power from a USB
port is quite limited.
 Tiny SATA USB Controller
I had no idea whether the serial ATA connectors on a notebook drive are
the same as those on a 3.5-inch desktop drive. It turns out that they
are. In this photo I was just checking to see. The computer that I
ended up installing this drive in had a SATA compatible power supply,
so I did not use the SATA to standard power adapter shown here.
 Serial ATA power and data connectors fit perfectly
The motherboard on this PC just happened to have an integrated SATA
controller. And the power supply also had the correct plug to fit. The
BIOS also supported booting from a SATA drive. If it hadn’t, I’m sure
that flashing the BIOS to the latest update would have corrected that.
 My new desktop hard drive installed
Before I went any further, I made sure the drive was visible in windows
explorer. There it is, model number and all. It shows up as a SCSI
drive for some reason, probably because the integrated SATA controller
is a RAID0/1 controller as well. The included software from Western
Digital is also there intact. The file system was FAT32.I then downloaded the Data Lifeguard Tools from Western Digital and
migrated the original hard drive’s contents to the new drive. That took
ALL NIGHT, probably 9 hours or more, and I don’t know why it was so
slow.
But the next morning, I shut the system down, unplugged the original
drive, and rebooted. XP booted properly, and everything came up fine!
The new hard drive works fabulously, it’s so quiet I can’t even hear it
seek unless I physically touch it to my ear. I then proceeded to write
up this article on the very PC pictured here!
This was a great hacking project, it was so easy, and I recommend it to
anyone. Next time I’ll try a different brand, just for adventure!
 Drive properties under Windows XP