Here’s one of my latest adventures: Try to achieve stoichiometric combustion
of waste vegetable oil. This is like trying to burn something
efficiently that really would rather do other things besides burn.
Mission accomplished, however.
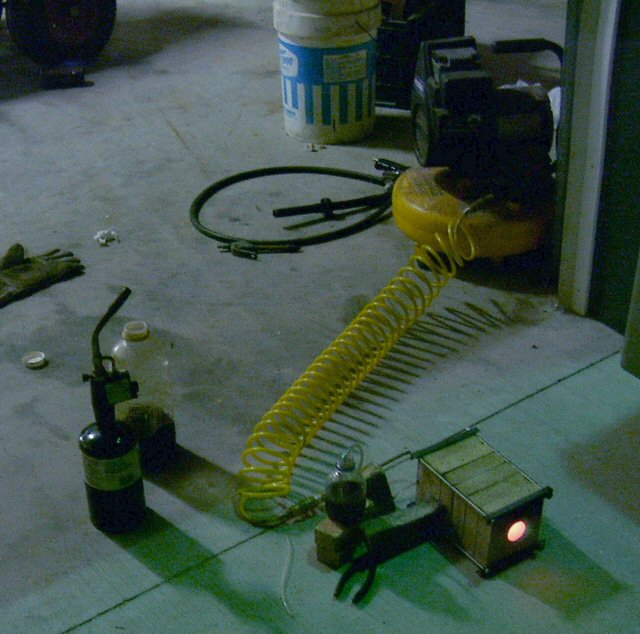
Key ingredients: Firebrick with EGR passages cut, compressed
air, and a duh-simple venturi to atomize the oil. This is still new and
I haven’t had a chance to do a real write up yet. In simple terms,
stoichiometric means an “ideal” combustion, usually with a blue flame
and no ash or soot. The glowing orifice you see is actually the orange
hot firebrick, but the flame is a nearly invisible blue.
Burner tube is constructed of firebrick
Here’s a more in-depth description of the stoichiometric combustion WVO burner. Warning:
Like all other projects described on this site, I assume no liability
whatsoever for you burning your house down or anything else bad that
happens from the application or misapplication of the following
information.The ignition system was a propane torch, the one seen on the lower left
of the photograph. The burner took a long time to light, and I had to
slowly switch from propane to WVO or the flame would extinguish and
start to puff out clouds of blue smoke. The propane torch is just a
plain bernzomatic soldering torch. I drilled a hole into the side of
the firebrick near the breach end to blast the starting flame into. In
the photo, this starting port is being mostly blocked by a fragment of
firebrick, seen on the left side of the burner.
Please understand that this thing is very much experimental and I am by
no means an authority on the subject. I can describe what I encountered
along this adventure and you will need to modify it to fit along with
your own knowlege and experience.
This is not a furnace; it is just a burner tube made of firebrick. I
took two carbide grit holesaws like what are intended for drilling
holes in ceramic tile and concrete, and I drilled a 1.5 inch hole
through the centers of I think 5 firebrick halves that measured approx
4.5 inch square by 1.25 inch thick. The burner was constructed by
stacking the bricks up and clamping together with some threaded rod.
The last firebrick by the exit end was drilled with a 1.25 hole saw,
little smaller to force some flame gasses back down the EGR passages
which I will describe next:
The EGR passages consisted of 12 holes about .1875 (3/16) inch
diameter, drilled around the edge of the holes in each firebrick,
precise enough to line up from the near the front of the burner to the
back. Then little slots were cut from the holes out into the main
burner tube cavity at each end. A little suction is formed at the
“breach” end of the burner because of the fuel air mixture blasted in,
and a little pressure formed near the “muzzle” end of the burner so
that flame gases flow back through the EGR passages to the breach end.
EGR by the way stands for “exhaust gas recirculation” just like in a
car engine. The inert exhaust gases help preheat the incoming air, and
help reduce NOx emissions.
I learned that a good flame with extremely low NOx emissions and with
EGR gases will burn greenish. I don’t know if my burner was indeed
doing this, but it did burn greenish. It could have been something in
the firebrick that was giving in the green color. It was mostly purple
and blue, but had greenish tinges to it especially at the flame tip.
Deep inside the burner close to the venturi it was all blue colored. I
don’t know what would have been in the firebrick or anywhere else to
generate the green flame color so I like to believe that my burner was
burning extremely clean and with very low NOx emissions.
The venturi is like this: I took a 1/8″ NPT brass plug and drilled a
1/16″ hole down the center, and another hole at right angles to the
first hole, drilling into one of the flats (that you would put the
wrench onto tighten the plug). I only drilled this until it broke
through into the first hole.
Then I took a piece of 1/16″ brass tubing like you get in hardware
stores in those K&S metal centers (don’t know if your familiar with
those), hobby stores often carry this fine tubing as well. The hole in
the center of this tubing is only about .035 inch. I filed the end of
the tubing to a 45 degree angle.
I screwed the brass plug into fittings that attached to my air
compressor so that air blows through the hole lengthwise in the plug.
The brass tubing with the end filed at an angle inserts into the
perpendicular hole so that a little air can escape around the angled
tip. This creates a real nice suction in the brass tube to suck up the
oil and vaporize it into a very fine mist.
No preheating of the oil or compressed air was needed. After the
interior of the burner was up to a red hot glow, the propane torch
could be removed from the starting port as long as care was taken to
block off air from being drawn into the starting port. A litte
experimenting was done with throttling the starting port, and I found
that allowing a litte air to come in would make the flame “suck” back
into the burner instead of burning somewhat outside the muzzle.
My camera did not do a good job of showing the interior of the burner
when it was operating, but with my eyes I was able to observe the
operation of the EGR passages. The inside wall of the burner tube had
orange, almost bright yellow lines on it right where the EGR passages
were, and they extended all the way back to the breach end where the
fuel air mixture entered. So I know that some of the flame gases were
indeed traveling back and helping to preheat and ignite the fuel air
mixture at the breach end of the burner.
I’ve tried lots of different designs for WVO burners but with very low
success. Nothing that I would post on my web page. But this one worked
almost like magic and Im just incredulous how much better it worked
than other ones I’ve tried. I think the secret is in the EGR passages
and the oil atomizing venturi. Oh–one other thing I was using 60-80
psi on the air, but so litte air was needed that my little compressor
only ran about every 3 or 5 minutes.
Please bear with me folks, I may not get photos up here real soon as
I’m busy with many projects all the time. I hope to get some diagrams
and more photos here eventually, though.