Great ball o’ fire, it is!
It was a dark and stormy night…and the 3-watt generator lamp was
sporadic, cutting out altogether each time a whiff of snow happened to
come between its roller and the tire. “There’s got to be something
better,” the mad cyclist thinks to himself as he squints to make out
the faint halo of light cast by the 3-watt bottle dynamo generator.That
mad cyclist happened to be yours truly, and the above situation real to
life–and the inspiration for the MONSTER Quartz Halogen Bike Light!
The
cost of this project was somewhere around $100. I say ‘around’ because
I already had some of the hardware. But I try to figure that in to the
above amount!
lamps with protective cover glass built in. You can get these at any
store that has a decent lighting department, and they come in a
pleasing variety of wattages and beam patterns.
advantages, the selection of more commonly available small lead acid
batteries was drawn from. Plain old lead acid batteries have a few
winning traits besides: they can handle overcharging (a weakness of
NiMH!), and they do not develop a so called ‘memory’ from not being
properly cycled, like the NiCd. In addition, good luck finding a
12-volt, 7Ah NiMH or NiCd battery ready made! Ok, ok, someone on ebay
has them, but you don’t always know what you’re getting, and what about
the price tag?
charger, available in every store (in my area, anyhow!) that carries
batteries. I got mine at a Wal-Mart, but Quality Farm and Fleet, and
Meijer had them, all different brands, but I could tell they all came
off the same line!
battery and serves as an ‘on-board’ charger that can recharge the
battery overnight or even a few hours, depending on how low the battery
has been run.
by Shakespeare (Igloo and Coleman make similar). There are a lot of
different options to consider in battery mounting, but I chose the
‘battery bag’ idea because it allows me to take the battery completely
off the bike, with no bracket or box left behind! The insulating also
helps protect the lead acid battery from shock and vibration, and from
cold, especially on short commutes. No receptacle is available where I
park my bike at work, so it’s convenient to take the battery to the
power source for charging.
stuff sack where I carry my necessary tools for the road, emergency
rations, or whatever else I might need to carry (the other day: a 5lb
block of Muenster cheese, no less!)
taillight / reflector is made with a $2 driveway marking reflector
that’s D.O.T. approved; I’ve heard that the grade of plastic these are
made of is superior in it’s clarity and light transmission.
 Readily available components
The threaded end of an 1 1/2″ PVC cleanout adapter fitting is where the
quartz halogen lamp is mounted. I had to scrape a little at the very
end of the threads to get it to fit, but by convenient coincidence, the
lamp fits perfectly!
 PVC cleanout adapters are a perfect fit
The complete enclosure is made up of an 1 1/2″ Schedule 40 PVC cap, and
cleanout adapter. I did not glue the fittings together, but rather
drilled a small hole through both and put a screw in to keep them from
slipping apart. A small amount of silicone sealant is sufficient to
seal it, and permit separation if necessary.
 PVC-fitting headlamp enclosures
The on-board charger comes with hardware to mount it permanently to a
car battery, but I used the large L-shaped bracket as my headlight
mounting bracket. Because it has a long side and a short side, it
permits a variety of mounting options.
 Mounting brackets
This is really bad. Don’t do this unless you absolutely must. In any
case, cut a piece of inner tube to wrap around your mount point to keep
the bracket from marring! Further down on this page, I show a picture
of plumbing clamps that look and function very well.
 One type of bracket clamp
The commonly available MR-16 style sealed beam quartz halogen lamps,
WITH protective cover lens, are the heart of the bike light.I
was amazed by the array of these bulbs that my local Home Depot
carries. They come in wattages of 20, 35, 50, and 70 watts, and both
flood and spot, and you may find an occasional narrow spot.
I
currently use a 20 watt for low beam and a 35 watt for high. I used a
50 watt for a while, but I found it to melt the PVC headlamp enclosure!
A remedy for this is to drill a row of holes in the PVC
fittings below the lamp, for cooling air to enter, and then a row at
the back of the lamp, to exit. Optionally, a computer CPU fan could be
mounted on the back of the headlamp enclosure to force a blast of
cooling air through.
 Commonly available 12v MR-11 spot lamps
Here’s an array of some of the parts I used in the MQH bike light. The
L.E.D.’s are high intensity red from Radio Shack, and six of them were
used in the taillight. The switch is from Radio Shack also, but you can
order all of the needed electronic parts from a variety of online
sources including Ebay sellers, and save considerable $$.
 L.E.Ds, quartz halogen_lamp, and switch
A 1/16″ bit was used to drill these holes. Tapping was unnecessary, and
#4 phillips head stainless steel wood screws turn in nicely, as seen
below.
 Drilling for lamp retaining screws
Unless you want to catch something on fire, such as yourself or your bike bag, you must use a fuse to protect your wiring!
 Inline fuse holder
There is some considerable wiring to be crammed into the headlamp
enclosures. Something I had to figure out with the taillamp was to have
it operating with either or both lights. So there’s a diode in each
enclosure, too. Schematic soon to follow, to clarify this.
 Wiring in the headlamp enclosures
The European style terminal blocks needed to be trimmed to get them to fit side by side on the pins of the halogen bulbs.
 Trimming the terminal blocks
Here they are, tightened onto the pins. I considered soldering, but if the bulbs get too hot, the solder will melt!
 Terminals on both bulb pins
It took some careful planning, but there is just enough room in the
lamp enclosures for the bulbs and wiring. The wires need to be long
enough to allow the bulbs to come out far enough to access their
terminals. They can’t be too long, however, or there’s too much extra
wire to stuff in!
 Installing the bulbs
Just a note about small motorcycle batteries available in the stores:
They come with the acid in a separate container with instructions on
filling the cells. The battery is ‘dry charged,’ meaning that the
battery is at 75% charge as soon as you add the acid. The instructions
recommend doing an initial charge to top it off.
 Initial Charging
The onboard charger stays with the battery, ready to top it off. I used
electrical tape to secure it, and then it’s easy to remove if necessary.
 Onboard charger strapped to battery
The smaller battery is narrower, so I chose to mount the on board
charger on the side rather than the top. This configuration all depends
on what sort of home the battery will have!
 Onboard charger on 7Ah battery
The polarized connector permits removing the battery (and bag) from the
bike. The fuse holder is on the positive lead, with one end going to
the battery plus, and the other end soldered to the plus pin in the
polarized connector.
 Polarized connector, and fuse holder
I purchased two batteries, one is a 16C-BL, 19Ah jet-ski battery, and
the other a tiny 12N7, 7Ah motorcycle battery, both from local
superstores including a WalMart, as you can tell by the brand name.The larger one is quite heavy and takes up more space in the battery bag, so my use of it has been rather limited.
 Charging the big one
There’s plenty of room in my bike bag with the smaller battery in. I
can even fit in a 5lb block of cheese from the grocery store!I
also like to carry one of those light duty extension cords to plug in
the onboard charger whenever it needs it. A 6′ extension cord is just
perfect, as it doesn’t take up too much space in the bag.
The
battery bag is mounted to my Blackburn rack. To mount the bag to the
rack, I made a ‘floor’ out of plywood, then screwed some ClosetMaid
brand plastic clips onto the bottom of the bag to make it secure, yet
easily removable. The clips all face the same way so that I just place
the bag on the rack and slide it sideways to engage the clips. Then a
single bungee cord applies slight tenson on the clips to keep them
engaged.
 Short commute 7Ah suited up
In previous experiences in drilling polycarbonate reflectors (or
whatever it is they’re made of) I’ve learned that it’s better to sort
of ‘melt’ your way through them with a high speed.
 Drilling reflector on high speed
It’s just a basic 555
timer circuit that puts out a very fast flashing, an attention getting
pulsating. The six LED’s are wired in parallel sets of three each.The
LED’s were slightly tapered, and they pressed in and got tight in the
reflector. Silicone caulk is an excellent way to seal these.
 Tallight circuit detail
 Complete Schematic
Your mileage may vary, but this is the way I chose to mount my
taillight. The standoffs are available at Radio Shack or even a local
hardware store, but I had them in my spare parts box.
 Standoff, heated and pressed into reflector housing
These clamps came in a bag of 5, and I used two for the headlight and one for the taillight, with spares left over!These
clamps click down real tight and stay. Think about it, the plastic
they’re made of is formulated to withstand hot/cold temperatures,
vibration, and constant weight of water pipes. These particular clamps
also featured release tabs so they can be re-positioned or re-used.
 Ratcheting plumbing clamps
A single screw tightly mounts the reflector to the plumbing clamp, but still allows adjustment of the reflector’s angle.
Taillight on ratcheting clamp
Here you can see the screw in the center of the ratcheting clamp.
 Taillight on ratcheting clamp
I mounted the taillight as far to the rear as possible, to keep my foot
from hitting it on pedal stroke or stopping/starting. The rack stay was
just right for this.
 Taillight mounting detail
Screws and nuts fasten the pipe clamps to the L bracket, and I used a
piece of old inner tube rubber to protect from marring, and to give the
clamps something to ‘bite’ into and draw tight.
 L bracket with ratcheting clamps
You can mount the headlamps on either end of the L bracket.
 L bracket mounting possibility
Because it’s home made, there’s flexibility in mounting the MQH Bike Light.
 Below handlebar mounting
This is my current configuration, and it gives easy access to the
switches and doesn’t interfere with the brake and shift cables.
 Above handlebar mounting
Let me introduce you to my bike. It is a NEXT brand mountain bike,
hardtail, with front shocks and seatpost suspension. NEXT brand bikes,
according to my local GT Bicycles dealer, are made by Pacific Cycles
which also makes GT Bicycles. It appears that Wal-Mart exclusively
markets the NEXT bikes, which is where I got this one.Well, it
came with these nifty little Shimano shift indicators. I didn’t want to
remove them, so I just slid them aside on their little mounting rails
to make room for the MQH bike light.
 Shift indicators moved to the left
With the L bracket extending so far forward, I had to put a third
mounting screw in to clamp to the brake cable housing on part of the
brake lever assembly. The bike light would otherwise vibrate and jiggle
downward.
 Headlamp mounting detail
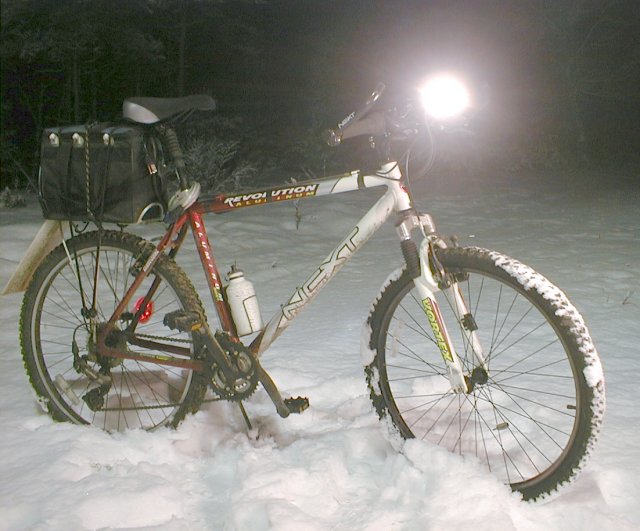
The picture hardly does justice to reality, but believe me, this light
is simply the brightest. It lights up the road like an airport runway.
Also, I have tested this light extensively and have several hundred
miles of the worst Michigan winter weather on it. It really SHINES!
 Lighting the way!