Low cost homebuilt hot air tool works wonderfully
You’ve probably seen how that modern circuit boards are all made with
the new (or maybe I’m just old?) surface mount technology, or SMT.
Well, what’s a guy supposed to do when he wants to salvage SMT
components from such “modern” boards? The commercially available
hot-air tools are quite expensive, in the hundreds of dollars, some
even thousands. Hmm. I wonder if I could make one…why not? The
following is a not-yet-complete story of one in the making.
The main barrel of the “pencil” is made from a piece of 1/4″ (7mm)
copper tubing. Inside the copper tubing is a 1/16″ brass tube with a
sheath of silicone tubing, obtained from the fuel line inventory at the
local hobby shop. It’s about the length of a standard pencil, but I
didn’t measure to get this exact!The construction is “coaxial” in nature, in that the power is conducted
down the center of the device, and the ground (or return) circuit is
the outer shell.
 Hot air pencil assembly
On the business end of this bad boy, there’s a tiny heating element
wound from .030″ stainless steel MIG welding wire. I wound the element
around a piece of steel wire that was slightly smaller than the center
brass tubing (I think it was .060″) and formed the lead from the tip
back to its socket, another piece of tiny brass tubing that is simply
pinched securely in place between the silicone and the copper tubing.NOTE:
A word here about silicone tubing–this is the good stuff. If you
attempt to make a hot air pencil like mine, do not substitute other
materials for the silicone tubing, such as the cheap vinyl stuff that
they sell in hardware stores. Silicone model airplane fuel line tubing
can withstand high temperatures without melting.
 Heating element nozzle
Ok, I’ll admit, it looks like a lousy soldering job, but it works. The
cord that goes from the power supply (a modified microwave oven
transformer, pictured on my hot wire foam cutting page)
is a piece of 2-conductor 16-guage extension cord. One wire is soldered
to the outer copper tubing, and one to the inner brass tube. A short
space on the end of the brass tube was left for the air hose to attach.
 Power cord connection
The air hose is plain old vinyl aquarium air line. It was too big to
seal directly onto the 1/16″ brass tube, so there’s a little bushing
made of tiny silicone tubing to adapt it. NOTE: The air supply is a low
cost air pump from the pet department at my local Wal-Mart. It is a
Whisper brand, with two outlets. I tee’d the two outlets together for
better air volume, and then put a tee-valve in line to regulate the
air, opening it to let a little escape.
 Air hose connection
In preliminary experimenting, I discovered something (that I should
have known!). Man, does that copper tube get blitzin’ hot! Not
surprising, considering that a red-hot glowing element is attached to
the end of it! So, a method was devised for making a most necessary
heat sink for the hot end. Here the photo shows me marking circles
around a bottle cap on a sheet of aluminum flashing. These circles were
cut out, and holes drilled in them to allow the hot air pencil to
protrude through them. The heat sink disks were attached with spacers
between and screws securing them to a 3-holed piece of aluminum
grounding bus bar like what’s used in circuit panels. This bus bar also
had a set screw that was tightened to the copper tubing.
 Making heatsink discs
Here it is, completed, and glowing with pride! The heat sink
arrangement GREATLY alleviated the too-hot-to-handle situation, but
after 15 minutes or so of operating, the black rubber tubing handgrip
did start to get a little toasty. Please see my much-improved wooden
hot air pencil further down on this page.
 Homemade SMT hot air pencil
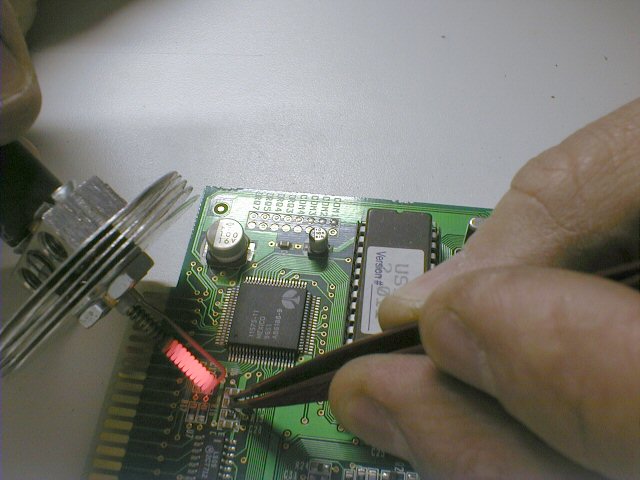
A little blast from the pencil, and resistors lift right off. Here I’m
using a tweezers to grab the resistor. The tweezers worked best for
devices having only two or three contact pads, like resistors,
capacitors, diodes, and SOT-package transistors.
 Desoldering a surface mount resistor
Ok, now for the real challenge–a SMT chip. This was a SOIC, or small outline integrated circuit
package. My method was to pry up GENTLY on one side of the chip, and
warm the leads on that side until the chip started to raise up. Then
the procedure was repeated on the other side. It doesn’t take long–a
lot of SMT chips can be desoldered in a short time!Another
technique that I have read about online, is to take a very thin sheet
of stainless steel shim stock, and slide it under the leads of the chip
as the solder melts. The stainless steel sort of repels solder because
it won’t wet it. So you get a real neat desolder job this way.
 Desoldering a small outline integrated circuit
The proofs in the pudding, as the worn-out saying goes. Here’s just a
small variety of parts that I desoldered in just a few minutes.MORE USES!! The hot air
pencil can also be used to “air brush” the burnt look onto pyrography
(woodburning) art! This is a potential artists tool! (I wonder if
anyone thought of this before?)
 A few examples of success
This cool new gadget is what powers the SMT hot air pencil. I know
you’re all saying, “Cool, but what’s in there?” The main ingredients
are a simple revision of the modified microwave transformer aparatus on
my Hot wire foam cutting page.
(Look at the second and third images.) I simply combined the dimmers,
the transformer and its power taps, and a two-outlet aquarium pump into
one pretty cabinet. One dimmer controls the transformer, and the other
controls air output by varying power to the aquarium pump.The photo is actually the second of two nearly identical prototypes
that I built. Everything fits very neatly onto a 6″ x 9″ melamine
board, with the front and rear panels of 3/32″ aluminum plate. The
front panel graphics were designed on computer, printed on photo paper
and shellacked, then glued to the front panel. The cover is just some
plain galvanized sheet metal (like what is used for ductwork), bent
into shape and pebble finished for a very professional appearance.
This power supply can also be used for powering a hot wire foam cutter.
The taps allow a variety of power output ranges for different lengths
and thicknesses of wire. The power supply could really be used for
quite a variety of variable power, low voltage applications. Plans soon
available to download for a small fee.
 The power and air supply
Here’s a shot of my grubby paw, comfortably gripping a much improved,
cooler hot air pencil. This sweet little unit is made out of a section
from an old broom handle. It is very advanced, however, from the pencil
that is pictured earlier in this page. The body has been carved into a
sleek, ergonomic three-sided grip and tapered off to the “eraser” end.God knew what he was doing when He created wood. This wooden SMT pencil
beats the original rubber and copper unit hands down. It stays cool a
very long time. No heatsink is needed, although I might add one disc of
aluminum as a heat reflector. But even now, I can comfortably sit down
and do an hour session or more with this.
It was tricky to make this one. I had to drill a number of holes
lengthwise down the handle. All of the “electrical and plumbing” are
done inside the handle as well, so there’s a lot of hardware crammed
down inside a 3/8″ hole. The electrical connections are made with some
modified terminal blocks, with holes drilled to access the set screws.
 NEW IMPROVED hot air pencil